Explore the collection
https://www.sideshow.com/collectibles/star-wars-do-or-do-not-there-is-no-try-501490UL

Do. Or do not. There is no try.

Art Print - Thomas Kinkade Studios

Price $265
5% back in Sideshow Rewards.

Description

“You will go to the Dagobah System. There you will learn from Yoda™. The Jedi™ Master who instructed me.”

The Rebellion Forces have escaped the Imperial Starfleet's discovery of their new base on the ice world of Hoth™. Luke Skywalker™ has told R2-D2™ that they are not headed to the Rebellion rendezvous point but are traveling to the Dagobah™ System. Obi-Wan Kenobi™ has told Luke: "You will go to the Dagobah System. There you will learn from Yoda™. The Jedi™ Master who instructed me."

Emperor Palpatine™ has told Darth Vader™ that there is a great disturbance in the Force, and the enemy is the young rebel who destroyed the Death Star™. This young rebel is the son of Anakin Skywalker™, and the Force is strong with this one.

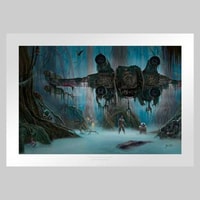
During their initial meeting, Yoda states that he cannot teach the boy, as Luke has no patience and is too old Obi-Wan reminds Yoda that Luke will learn patience. "Will he finish what he begins?" asks Yoda. After an intense training session, Luke's X-Wing slips deeper into the swamp where he landed. Luke's attempt to lift his fighter out and onto drier land fails, and it slips completely under the murky water. After Luke has turned away in frustration, Yoda uses the Force and deftly lifts the X-Wing out of the swamp and onto drier land. "I don't believe it!" says Luke. "That is why you fail," replies Yoda. Luke must always remember that his greatest ally is the Force. Thomas Kinkade Studios is pleased to present Do. Or do not. There is no try.

Inspired by the fateful events of Star Wars: The Empire Strikes Back, this incredible Star Wars art print is limited to 195 pieces and includes an individually numbered Certificate of Authenticity matched to the art piece.

Feel the Force around you, and bring home the Do. Or do not. There is no try. Art Print by Thomas Kinkade Studios today!

What's In The Box

Do. Or do not. There is no try. Art Print details:

  • Standard Numbered - Limited Edition of 195
  • Paper Dimensions: 31" x 22"
  • Image Dimensions: 18" x 27"
  • Premium heavyweight 100 lbs. paper
  • Long-life pigment inks that outperform conventional press inks
  • Edition number is applied to each Paper Limited Edition
  • Individually numbered Certificate Authenticity matched to the art piece
  • Made in the USA
  • Note: Physical printed art does not contain a watermark

Specs & Details

Product Size
Paper Size:
Height: 22" (56 cm)
Width: 31" (79 cm) *
Product Size
Image Size:
Height: 18" (46 cm)
Width: 27" (69 cm) *
Box Size
Height: 4.00" (10 cm)
Width: 4.00" (10 cm)
Depth: 30.00" (76 cm) *
Shipping Weight
3.00 lbs (1.4 kg) *
* Size and weight are approx. values
Learn more
SKU
501490UL
Vendor ID
111815
UPC
765014662735

© & ™ Lucasfilm Ltd.

Shipping

All fields required

At Sideshow, we want to make sure you receive your items with ease! That's why we offer worldwide shipping and flexible delivery options at checkout. And, for extra piece of mind, you can ask for double boxing! With our epic turnaround times, you'll be amazed at just how fast your order will arrive. More Info

Find Locally

Store Locator

30-Day Guarantee

At Sideshow, we're all about putting a smile on your face! (Don't worry, not that Joker smile) We have a 30 day guarantee designed to give you peace of mind. If you're not 100% thrilled with your purchase, just let us know. Go ahead, add that must-have item to your collection and rest assured, we've got your back.

Returns

Sideshow's return policy is a beacon of hope for all collectors! With a full 30 days to return any item that doesn't meet expectations, this policy puts the satisfaction of fans first. No stress, no fuss - just the chance to make every purchase a legendary one.

“You will go to the Dagobah System. There you will learn from Yoda™. The Jedi™ Master who instructed me.”

The Rebellion Forces have escaped the Imperial Starfleet's discovery of their new base on the ice world of Hoth™. Luke Skywalker™ has told R2-D2™ that they are not headed to the Rebellion rendezvous point but are traveling to the Dagobah™ System. Obi-Wan Kenobi™ has told Luke: "You will go to the Dagobah System. There you will learn from Yoda™. The Jedi™ Master who instructed me."

Emperor Palpatine™ has told Darth Vader™ that there is a great disturbance in the Force, and the enemy is the young rebel who destroyed the Death Star™. This young rebel is the son of Anakin Skywalker™, and the Force is strong with this one.

During their initial meeting, Yoda states that he cannot teach the boy, as Luke has no patience and is too old Obi-Wan reminds Yoda that Luke will learn patience. "Will he finish what he begins?" asks Yoda. After an intense training session, Luke's X-Wing slips deeper into the swamp where he landed. Luke's attempt to lift his fighter out and onto drier land fails, and it slips completely under the murky water. After Luke has turned away in frustration, Yoda uses the Force and deftly lifts the X-Wing out of the swamp and onto drier land. "I don't believe it!" says Luke. "That is why you fail," replies Yoda. Luke must always remember that his greatest ally is the Force. Thomas Kinkade Studios is pleased to present Do. Or do not. There is no try.

Inspired by the fateful events of Star Wars: The Empire Strikes Back, this incredible Star Wars art print is limited to 195 pieces and includes an individually numbered Certificate of Authenticity matched to the art piece.

Feel the Force around you, and bring home the Do. Or do not. There is no try. Art Print by Thomas Kinkade Studios today!